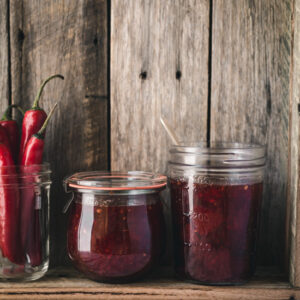
Make Your Own Spicy Strawberry Jam
With plump strawberries and fresh chilli, this jam brings a little something special to your breakfast toast. It is great with both sweet and savoury dishes.
Print
Pin
Servings: 45 serves
Calories: 77kcal
Equipment
- heavy pot
- jar and lids
Ingredients
- 1 kg / 35.3 oz slightly unripe and ripe strawberries
- 750 grams / 26.45oz raw caster sugar
- 1 tablespoon vegetable oil
- 2 red chillies finely chopped
- The juice and zest of 3 lemons
- 1 teaspoon sea salt
Instructions
- Put three spoons in the freezer.
- Hull the strawberries and cut the larger ones in half.
- Put the berries in a bowl and add 500 grams of sugar. Stir to coat and set aside.
- Heat a heavy bottomed pot on low heat and add the oil. Add the chillies and cook for 10 minutes or until perfectly soft.
- Add the sugared berries, the lemon zest and juice to the pot and stir.
- Bring the mixture to a good boil for 20 minutes, stirring occasionally to ensure the jam doesn't stick. Watch that the pot doesn't overflow.
- Add the remaining 250 grams of sugar and the salt. Stir to combine and continue to cook for another 20 minutes or until setting point.
- While the jam is cooking, sterilise your jars. See Notes below.
- Begin testing the jam for setting point 10 minutes after adding the second batch of sugar. The setting point of a jam or jelly is 105°C (221°F) so we can easily and accurately test using a thermometer. You can also use the frozen spoon method. Put a drop of jam on to one of the frozen spoons and allow to cool. If, when you drag your fingertip through the jam the path remains clean and doesn't fill with jam again, the jam is at setting point. This may take 30 - 40 minutes.
- Carefully pour the jam in to the sterilised jars and seal with the lids. You can store this strawberry jam in the fridge straight away and it will keep for a few weeks but if you want to shelf store it for up to 12 months, you'll need to heat process your jars.
To Heat Process Your Jam
- Put a large pot (the taller the better!) on your stovetop and pop a folded tea towel in the bottom of the pan. Try and get the towel to lie as flat as you can to avoid tipping the jars.
- Sit the jars on the towel, placing them away from the side of the pot and with space between each jar. Important: don’t overcrowd your pot. Your jars can sit close to each other but don’t let them touch the sides of the pot. You are better to heat process in batches than try and cram all the jars in together.
- Pour water into the pot, making sure the water temperature roughly matches the temperature of the jars. This way you'll avoid thermal shock and smashed jars. Cover the jars completely in water, or at least three-quarters of the way up the jar. If I use different sized jars I fill the pot three-quarters of the way up the largest jar.
- Bring the water to a gentle boil over medium heat. From boiling point set your timer to 10 minutes.
- Once the heat processing time is up, remove the jars from the pot with preserving clamps or protect your hands with a really thick cloth and place them on a tea towel on your bench. Don't place them directly on to your bench because the cool bench may crack your hot jars. At this stage the lids of the jars will be puffed up, or convex. As they cool, a vacuum seal with form and the lids will become concave. This may take up to 12 hours.
- To test your seal, remove the lid ring (if you are using 2-piece lids) and then try to pry the flat part of the lid from the rim of the jar. Don't try too hard, we are just checking for resistence. If you have it, your jars are sealed.If one jar doesn’t seal, pop it in the fridge and eat it within a few weeks. If multiple jars don’t seal, try and re-heat process them.
Notes
How to Sterilise Your Jars and Lids
The Oven Method (Jars)
- Wash you jars and lids in hot soapy water and give them a good rinse, or put them through a hot dishwasher cycle with no soap.
- Once washed and rinsed, place the jars on a clean baking tray facing up. Gently place them in a cool oven.
- Turn the oven on to 100°C (212°F) and set your timer for 15 minutes or until the jars are completely dry. Remove them from the oven. This is for the jars only.
- Put the jars into a large pot and cover them with cool tap water
- Bring water to the boil
- Boil the jars for 5 minutes
- Carefully remove the jars with preserving clamps or tongs and either allow to air dry on clean kitchen towels or in a warm oven (100°C).
- Place lids in a saucepan of water and boil for 5 minutes.
- Remove with tongs or a lid magnet.
- Let them air dry on a wire rack or clean kitchen towels
- Make sure your lids are completely dry before using. If they are still a little wet, dry them inside with a clean cloth or paper towel.
Nutrition
Calories: 77kcal | Carbohydrates: 19g | Protein: 1g | Fat: 1g | Saturated Fat: 1g | Sodium: 53mg | Potassium: 45mg | Fiber: 1g | Sugar: 18g | Vitamin A: 22IU | Vitamin C: 16mg | Calcium: 6mg | Iron: 1mg
Tried This Recipe?I'd love to hear your feedback. Rate it & leave your feedback in the comments section below. Or you can tag @mygoodnesskitchen or hashtag #mygoodnesskitchen on Instagram.